Compressing Images using Front-end JavaScript
This is an edit of an article from my previous website, written in 2021. Since then, some information has changed and my prose has improved, so this article has been rewritten and it’s sources updated as of 2024/04/13.
Part 1: Compressing inanimate images
I’ve been working on some personality quiz generator software, completely made using front-end javascript. With that, I need the ability for users to add images to to their quizzes characters and questions, but also for these images to be compressed, and to be shrunk to the size necessary for the quiz. For static unmoving images, that is quite easy. I personally like to use the browser-image-compression library because it’s easy to plug in and make image compression a part of your process.
browser-image-compression has plenty of features to ensure the image is compressed properly, including max dimensions, max file size, exif orientation, filetype conversion, and helper functions. It also operates using a Web Worker, which completes it’s job incredibly quick and asyncronously. Here’s an example of me using this library:
import imageCompression from 'browser-image-compression'

/**
 * Compresses an image from a file input
 * @param {File} img A file from an Input element
 * @param {number} size The max px width or height of the image. Default is 300
 * @returns {string} a URL of the new image
 */
export default async function compressImg(img, size = 300) {
  const compressedImg = await imageCompression(img, {
    maxWidthOrHeight: size, // Size of output image
  })
  // Output the compressed image to an array buffer
  let buffer = await compressedImg.arrayBuffer()
  // Turn that array buffer into an ObjectURL, for use as an img src
  return URL.createObjectURL(new Blob([buffer], {type: img.type}))
}
This will output a compressed image with little to no visual difference from the original:
Original Image
476 KB
browser-image-compression Result
152 KB
Of course, this has it’s limitations.In particular, no personality quiz is complete without the ability to add animated GIFs, and browser-image-compression will always fall short.
Part 2: The Best Formats
GIFs are the predominant form of sending animations online, but they aren’t actually the best file format for the job. They’re bulky and don’t use any of the modern compression codecs that we use to compress video files. The one advantage it has over a lot of other formats is compatability. In particular, if you wanted to use a modern file type like WebP or AVIF you might have to include alternative versions of these videos to accomodate users with older browsers. Edge only started supporting AVIF in January of 2024.
If you wanted to use browser-image-compression or a similar library like Google’s Squoosh, you won’t get an animated result back. browser-image-compression predominantly works by plopping an image into a canvas dom object, and then screenshotting the canvas. That means that animated images only have their first frame saved. If you want to compress a GIF image down, you’ll need to convert it to a video file.
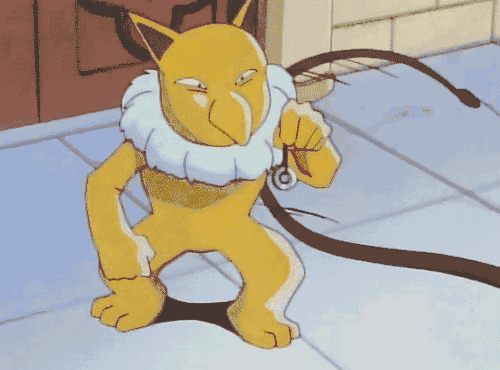
Here are some GIFs that I have compressed into various formats. They’ve all been resized to 500px x 370px.
Original Image
774 KB
browser-image-compression

118 KB
APNG
661 KB
WEBP

193 KB
AVIF

43 KB
MP4
61 KB
The most impressive of these compressions is clearly the AVIF format, which is now supported by all modern browsers. If you wanted something that will work everywhere though, I’d stick with the MP4 format.
Part 3: Using FFMPEG to Compress GIFs
If you don’t know about FFMPEG, it’s an open source software that can record, convert, edit, and stream video and audio. If you downloaded this software from their site, you would primarily interact with it’s command line interface. Since it’s a command line tool, using it would look like this:
ffmpeg -i input.avi -vf w=300:-2 output.mp4What this command does is take in a input.avi file, scales the video to 300px wide using the -vf w=300:-2 option, and then outputs the output.mp4 file. the -2 ensures that the output will be an even number, as is needed for the MP4 codec. This example and more details on how to operate their software can be found in the documentation section of their site. I’ve also found FFMPEG wiki to eb quite helpful.
For my needs, I’m going to use the FFMPEG.wasm library, which allows me to use the FFMPEG library as part of a front-end JavaScript project. It’s a WebAssembly port of FFMPEG, which means that it will operate less as a JavaScript script, and more as an executable accessible to the browser, which ensures speedy results.
Here’s a similar function to the one using bowser-image-compression, but now using FFMPEG to compress a GIF into an MP4 file:
import { createFFmpeg, fetchFile } from '@ffmpeg/ffmpeg';
const ffmpeg = createFFmpeg({log: true});

/**
 * Compresses an MP4 from a GIF file input
 * @param {File} img A file from an Input element
 * @param {number} size The max px width/height of the output video. Default is 300
 * @returns {string} a URL of the new video
 */
function compressGif(img, size=300) {
  // A promise, that resolves with the URL Object of the new compressed MP4
  return Promise((resolve, reject) => {
    // Load up FFMPEG, then save the file for use in FFMPEG
    ffmpeg.isLoaded() ? "" : await ffmpeg.load();
    ffmpeg.FS('writeFile', 'convert.gif', await fetchFile(img))

    // Convert and compress your GIF into an MP4
    await ffmpeg.run(
      '-i', 'convert.gif', // Input File
      '-vf', `scale=w='2*trunc(${size}/2)':h='2*trunc(${size}/2)':force_original_aspect_ratio=decrease`, // Scale to new size
      'out.mp4' // Output
    )

    // Read the output file, and return the result
    const data = ffmpeg.FS('readFile', 'out.mp4')
    resolve(URL.createObjectURL(new Blob([data.buffer], {type:'video/mp4'})))
  })
}
You likely noticed that the parameters for ffmpeg.run() match the options given when using FFMPEG via the command line. That means you can use any of the options available to FFMPEG as parameters to that function. The scale option of -vf is quite good at scaling the video, and the added :force_original_aspect_ratio=decrease ensures that the output size will retain the ratio of the original GIF, using the max height and width set with the size variable. I added some math to the width and height of the scale to ensure that the output dimensions are both even numbers.
Of course, you could give it plenty more options. When GIFs have transparency, FFMPEG will add a white background by default. If you want to specify a background, you’ll have to do a decent amount more work. Here’s the inputs that help me define a color as a background.
  await ffmpeg.run(
    '-f', 'lavfi',
    '-i', `color=A778FF`,
    '-i', 'convert.gif',
    '-filter_complex', `"[0][1]scale2ref[bg][gif];[bg]setsar=1[bg];[bg][gif]overlay=shortest=1,scale=w='2*trunc(${size}/2)':h='2*trunc(${size}/2)':force_original_aspect_ratio=decrease"`,
    '-pix_fmt', 'yuv420p',
    '-crf', '15',
    'out.mp4'
  )
This ends up quite different from the original options, and for a few reasons:
-f lavfiis the filter library I am using. This is the filter library required to use the-filter_complexto overlay and scale the video.-i color=A778FFcreates a layer before my actual gif input. This layer is just a solid color(#A778FFhexidecimal).-filter_complex'is the more complicated set of items to explain. Using a set of parameters for the filter_complex, I overlay the color with the GIF itself, retaining the scale of both, choosing the shortest input (which color goes to infinity by default), and scaling it (considering that the codec requires an even number). Note that this has an extra set of quotes inside, just to ensure that any spaces don’t mess up our other commands.-pix_fmt yuv420pDefining the pixel format to one that is compatible (for these filters we should useyuv420p, which is always a safe choice).-crf 15defines the Constant Rate Factor, which I like to keep at 15. You could also input keywords like fast, medium, or slow.
This will output the following:
No Background Added
Background Added
It’s also worth noting that when debugging in Firefox, viewing the FFMPEG logs in DevTools can cause a different error to show. Thanks LolkeAB on github for better defining this issue.
Part 4: The HTML
One last thing to talk about when it comes to compressing GIFs to Video, is now you need these videos to act like GIFs on your website. That’s actually quite easy. Instead of using an img tag, you should now use the video tag. Adding the playsInline autoPlay muted loop attributes ensure it starts playing and looping automatically. Even though your gif never had sound, the muted attribute is required for autoplay to work in most browsers.